Some of you may have noticed my newest advertiser on the left hand column - the pretty blue box that says "Lewis and Sheron Textiles." I was surprised when they emailed me about advertising because I had just ordered some swatches from them the week before. I had heard about how great their selection/prices were from the post "Fabric Searching on the Cheap" on Cote de Texas. As some of you may remember, I was on the search for a fabric to make curtains for my new apartment. The current curtains are tan and drab and do not tie together my new Iranian rug and my sofa. Below is a picture:
Pretty drab right? Well, I got some amazing tips and suggestions from you guys, and I finally found something I like at the right price point.
The fabric I chose. (I'll be doing a curtain reveal soon).
via Danielle Oakey Interiors
Well, several of the swatches I tested were from Lewis and Sheron, and they stood out because the swatches were the largest I received - around 18" L by 5" W. Also - they were the only store to include matching trim samples at no extra cost.
So, now that I've found fabric for my curtains, I need to sew several pillow covers to create some cohesion between my drapes, rug, and sofa. So, I've ordered several swatches from the www.lsfabrics.com site, which allows me to sort by colors. I want fabrics with reds, blues, and blacks - all of which are present in my rug.
It's easy to select a color and see all the trims and fabrics with the selected color.
You can also search by other criteria
Your cart selections are visible on the top of the site.
Below are some of the swatches I ordered from Lewis & Sheron to see if they'll make good matches for pillowcases.
Stay tuned later in the week for a really great giveaway from Lewis & Sheron!
disclosure* This post is sponsored by Lewis & Sheron Textiles
Showing posts with label my apartment. Show all posts
Tuesday, November 29, 2011
Tuesday, November 8, 2011
How To: A Kitchen Pegboard Wall Organizer
As I promised a couple of weeks ago, here is a fairly-easy DIY (and very inexpensive) that can save you at least one cabinet's worth of space. For tiny kitchens, like mine - our pan and utensil organizer is a lifesaver. It can also look good and blend into your existing kitchen aesthetic with a couple of coats of paint.
The pegboard - finished!
(I apologize for the weird look of the photos - our camera is on the fritz)
We simply didn't have enough cabinet space to hold all of our pots and pans, and our kitchen only had one very small drawer in it. We purchased a baker's cart, (our's is from Ikea), which definitely helped the situation, but we still needed more storage options if we wanted easy access and organization of our most commonly used kitchen wares. I thought pegboard would be the perfect solution (Julia Child made the idea famous), and figured above the baker's rack would be the perfect spot.
First, I wanted to see how other people had implemented a pegboard into their kitchen so I could get some tips and words of wisdom.
The below proved to be valuable resources:
• Apartment Therapy "How To: Make a Pegboard Wall Organizer"
• DIY Network "How to Install a Pegboard" (gives thorough directions on how to measure, frame, and install the board).
The Price break-down:
• Pegboard: $17.48 (We also had it cut to size - most home improvement stores provide this service
• Framing wood: Scraps leftover from a previous project
• 32 piece assorted pegboard hooks: $3.87
• Tool rack: $2.97 (See where I used it for holding measuring cups)
• Anchors: $1.98
• Screws: $1.18
• Paint: (Leftover high gloss and flat paint (I mixed them to create a finish more durable than flat, but less shiny than gloss) from when I painted the kitchen.
Also note, we did this without a drill, but it is definitely easier to use a drill than drive the screws by hand.
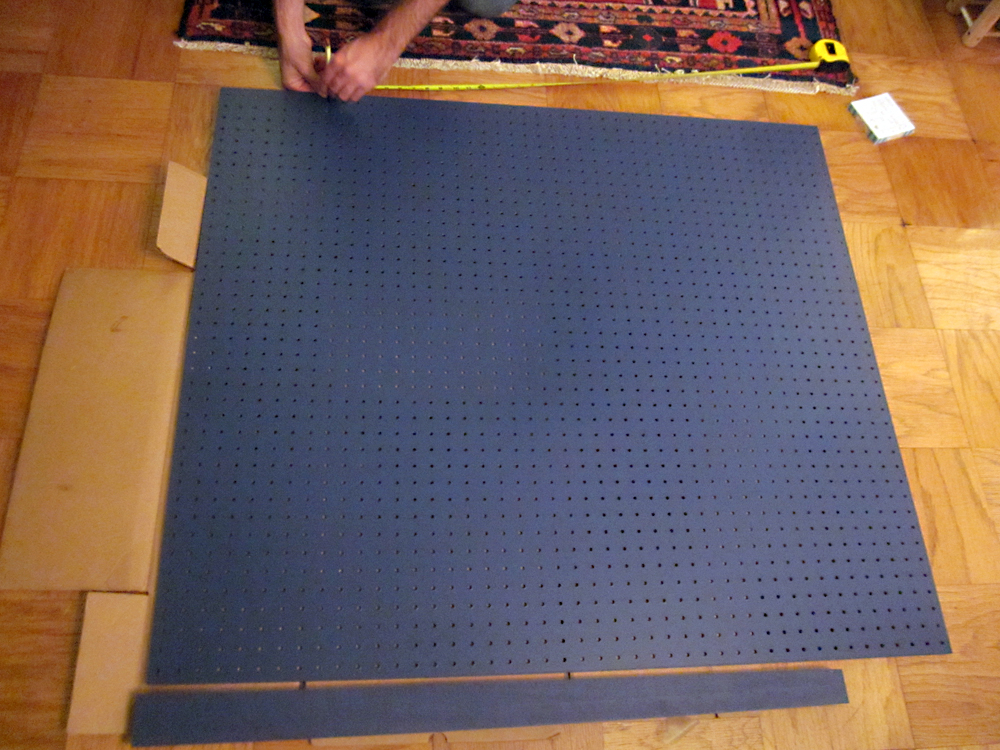
We started out with 2 pieces of wood to "frame" the pegboard, and a piece of white pegboard cut to the desired size. The purpose of putting the "frame" behind the pegboard is to create enough space between the wall and the pegboard to insert the various hooks. I painted the wood and the pegboard with leftover paint from when I painted the kitchen. I wanted the pegboard to blend in with the wall.
From this side angle you can see how the frame creates enough space between the wall and the pegboard.
Chris has much more patience with measuring and prep work, and is better with math, so he did the measuring to attach the frame to the pegboard. We chose to attach the frame to the pegboard, than mount it to the wall, but it might be easier to mount the frame to the wall, and then mount the pegboard to the frame.
Chris also carefully measured where to put in anchor screws so the screws in the frame would line up.
Then tighten the screws into the anchors!
Now comes the fun part - getting to arrange pots, pans, and other utensils on the pegboard!
A variety of hooks
My package of hook assortments also came with hook locks - the black piece you see over the hook, which I didn't know about, but they are great at keeping the hook from falling out when you take a pan down.
I was lucky that the bottom of our baker's cart's shelves were slatted, and our pot and pan lids fit perfectly in them!
The magnetic knife strip I actually found on the curb in someone's giveaway pile. I simply purchased screws long enough to go through the knife strip, pegboard, height of the frame, and then into the wall - and now have easy access to my knives.
What do you think? Would you ever consider a pegboard organizer in your kitchen? Do you currently have one?
The pegboard - finished!
(I apologize for the weird look of the photos - our camera is on the fritz)
We simply didn't have enough cabinet space to hold all of our pots and pans, and our kitchen only had one very small drawer in it. We purchased a baker's cart, (our's is from Ikea), which definitely helped the situation, but we still needed more storage options if we wanted easy access and organization of our most commonly used kitchen wares. I thought pegboard would be the perfect solution (Julia Child made the idea famous), and figured above the baker's rack would be the perfect spot.
First, I wanted to see how other people had implemented a pegboard into their kitchen so I could get some tips and words of wisdom.
The below proved to be valuable resources:
• Apartment Therapy "How To: Make a Pegboard Wall Organizer"
• DIY Network "How to Install a Pegboard" (gives thorough directions on how to measure, frame, and install the board).
The Price break-down:
• Pegboard: $17.48 (We also had it cut to size - most home improvement stores provide this service
• Framing wood: Scraps leftover from a previous project
• 32 piece assorted pegboard hooks: $3.87
• Tool rack: $2.97 (See where I used it for holding measuring cups)
• Anchors: $1.98
• Screws: $1.18
• Paint: (Leftover high gloss and flat paint (I mixed them to create a finish more durable than flat, but less shiny than gloss) from when I painted the kitchen.
Also note, we did this without a drill, but it is definitely easier to use a drill than drive the screws by hand.
We started out with 2 pieces of wood to "frame" the pegboard, and a piece of white pegboard cut to the desired size. The purpose of putting the "frame" behind the pegboard is to create enough space between the wall and the pegboard to insert the various hooks. I painted the wood and the pegboard with leftover paint from when I painted the kitchen. I wanted the pegboard to blend in with the wall.
From this side angle you can see how the frame creates enough space between the wall and the pegboard.
Chris has much more patience with measuring and prep work, and is better with math, so he did the measuring to attach the frame to the pegboard. We chose to attach the frame to the pegboard, than mount it to the wall, but it might be easier to mount the frame to the wall, and then mount the pegboard to the frame.
Chris also carefully measured where to put in anchor screws so the screws in the frame would line up.
Then tighten the screws into the anchors!
Now comes the fun part - getting to arrange pots, pans, and other utensils on the pegboard!
A variety of hooks
My package of hook assortments also came with hook locks - the black piece you see over the hook, which I didn't know about, but they are great at keeping the hook from falling out when you take a pan down.
I was lucky that the bottom of our baker's cart's shelves were slatted, and our pot and pan lids fit perfectly in them!
The magnetic knife strip I actually found on the curb in someone's giveaway pile. I simply purchased screws long enough to go through the knife strip, pegboard, height of the frame, and then into the wall - and now have easy access to my knives.
What do you think? Would you ever consider a pegboard organizer in your kitchen? Do you currently have one?
Wednesday, October 26, 2011
An easy furniture repurposing idea and an AMAZING GIVEAWAY!
So remember last week when I revealed my kitchen after stenciling it with a Royal Design Studios stencil? Well, I have an addition to that kitchen to reveal - and am announcing a giveaway hosted by Royal Design Studios! To enter the stencil giveaway, go to the Royal Design Studios site, peruse the amazing stencil selection, and come back here and leave a comment, or email me, with the stencil that you would like to win. To comment on this post (scroll to the bottom of this post and right above "Labels" you will see a number followed by the word "comments." Click on the word "Comments." Or, you will see a link, "Post a Comment," which you click on to comment.
If you receive posts in your email feel free to respond to the email noting that you'd like to be entered in the drawing. Then, go to Royal Design Studio's facebook page and "Like" them. For this giveaway, the stencil you select must be under $50.
Here is my kitchen and the easy furniture repurposing idea:
For this project I repurposed a medicine cabinet into a spice rack.
Here is the mirror situation that was in our bathroom when we moved in. It has since been amended. The medicine cabinet, on the right, was not my style at all, with the carved flowers and dry brush metallic silver paint treatment.
I unmounted the cabinet, and removed the door/mirror. I also gave the cabinet a wash with a cloth and mild soap. I decided to leave the holes where the door was attached and the magnetic closure. I liked that it added some history/story to the piece.
I painted the cabinet in an eggshell white with a roller. A roller creates a smoother finish than a brush. I used a brush to get into the corners. Note to the wiser than me: If you're not sure the finish of the furniture you're about to repaint/refinish - sand it (and wear a mask in case the previous finish is nasty), and PRIME. Turned out the paint didn't stick to well to whatever finish the cabinet had on it originally, so I had to go back and prime it.
voila! The finished medicine cabinet turned spice rack in our new kitchen!
It looks like a custom piece, and the white contrasts nicely off the navy blue, I think.
I'm working on another kitchen DIY which I'll reveal next week. I'm very excited about this one - as it's going to free up a cabinet's worth of space.
I'll end by leaving you with some stenciling inspiration from RDS. Remember to comment with the stencil you'd like to win and "like" them on facebook! (They also have a Twitter feed). The drawing closes Nov. 2nd at 6 PM EST. I'll announce the winner the following day. Good luck!
If you receive posts in your email feel free to respond to the email noting that you'd like to be entered in the drawing. Then, go to Royal Design Studio's facebook page and "Like" them. For this giveaway, the stencil you select must be under $50.
Here is my kitchen and the easy furniture repurposing idea:
For this project I repurposed a medicine cabinet into a spice rack.
Here is the mirror situation that was in our bathroom when we moved in. It has since been amended. The medicine cabinet, on the right, was not my style at all, with the carved flowers and dry brush metallic silver paint treatment.
I unmounted the cabinet, and removed the door/mirror. I also gave the cabinet a wash with a cloth and mild soap. I decided to leave the holes where the door was attached and the magnetic closure. I liked that it added some history/story to the piece.
I painted the cabinet in an eggshell white with a roller. A roller creates a smoother finish than a brush. I used a brush to get into the corners. Note to the wiser than me: If you're not sure the finish of the furniture you're about to repaint/refinish - sand it (and wear a mask in case the previous finish is nasty), and PRIME. Turned out the paint didn't stick to well to whatever finish the cabinet had on it originally, so I had to go back and prime it.
voila! The finished medicine cabinet turned spice rack in our new kitchen!
It looks like a custom piece, and the white contrasts nicely off the navy blue, I think.
I'm working on another kitchen DIY which I'll reveal next week. I'm very excited about this one - as it's going to free up a cabinet's worth of space.
I'll end by leaving you with some stenciling inspiration from RDS. Remember to comment with the stencil you'd like to win and "like" them on facebook! (They also have a Twitter feed). The drawing closes Nov. 2nd at 6 PM EST. I'll announce the winner the following day. Good luck!
Wednesday, October 19, 2011
My kitchen reveal - check out our new paint job!
I'm so excited to share with you guys the brave feat of painting that just took place in our kitchen, which Chris and I moved into in August. I was lucky enough to have the gracious folks over at Royal Design Studio contact me to see if I'd like to do a stencil review on Decorology. Uh....yeah! I instantly knew the effect I wanted to get, which is a sheen effect.
The inspiration for the look I wanted - a gloss/matte sheen effect came from photos I'd collected similar to the one below:
So...here was our kitchen before...pretty standard for a 1 bedroom apartment in a building...
And...here is the kitchen after...
pretty drastic change right?
The stencil I selected was the Large Marrakesh Trellis. Chris and I took a trip to Morocco two January's ago, and the tiles and ornate plaster work will leave your jaw on the floor. The stencil reminded me of the tours we took of medersas in Fes and Marrakesh.
The stencil as featured on the Royal Design Studio site
An illustration of the stencil showing the registration marks and the scale.
The stencil also came with some instructions and stencil care information.
Once I received the stencil, and before setting off to paint - I did some research on how to achieve the look I wanted. Like most projects, prep work is key!
The Royal Design Studio site offers a lot of resources and tips for stenciling. I got the basics from their Basic Stencil Techniques page for all over stencil patterns.
I knew to achieve the look I wanted I would need the same paint color, but in different sheens. I chose gloss and flat. Here's where I ran into a little issue. Once I got the stencil I realized that, if I put down the solid flat coat first, the way the stencil is cut, most of the wall would end up being gloss. I didn't want that because I was afraid the room would be too shiny. However, upon doing research and asking around, painting a solid base of the gloss and then painting the stencil in flat over the gloss wouldn't work either, because the matte paint would not adhere to the gloss painted wall. Hmmm...I was stuck.
So, being the extremely stubborn woman I am, I did a little more research and came across the talented Megan Bouton, who was the genius behind this wall treatment:
Check out her gorgeous dining room here.
Just the look I wanted! So I wrote her asking what she did to get the matte paint to work over the gloss, and she was awesome enough to reply that she hadn't done anything special, and that even a year later she can't even scratch the matte off with her fingernail.
So, I decided to give it a try, and here is my process and results
First, we covered the walls in a high-gloss navy called "Royal Hyacinth" from Olympic. I hadn't painted in high-gloss before, and it sure is shiny! It also required 3 coats to get everything of uniform "glossiness." You also need to work with a nice wet roller, because if it gets too dry it will just lift up the some of the paint you just put on - which is super noticeable the glossier your paint is. We also taped off the edges with a standard blue painters tape.
Some supplies you will NEED:
• stencil spray adhesive. Don't go with a general adhesive spray - that didn't work for me. Get a spray specifically for stencils at a craft or hobby store. Also - wear a mask when you work with it - it's not the most lung friendly stuff.
• level. very important for making sure you aren't taping the stencil up out of line.
• a small roller. If you are working with glazes and/or diluted paints use a stencil brush, which the folks over at Royal Design Studio recommend. I knew I'd never finish unless I used a roller. I used a brush for corners and touch-ups.
• painter's tape. Okay, I hate to diss a product, but the green tape pictured here - called Frog Tape, wasn't strong enough to hold up the stencil. I'm sure it's great for it's intended purpose, but it wasn't sticky enough for the Mylar stencil. I ended up using the traditional blue painter's tape.
• patience. Don't expect to finish this in the amount of time it takes to simply paint a room. The more care you take doing research, practicing, and lining up your stencil, the more beautiful the result will be.
Optional:
• a brayer: you can purchase at your crafts/hobby store. If helps press the stencil flat on the wall more quickly than using your fingers.
Also - I recommend practicing before you start stenciling, especially if you haven't done it before. I just used a large piece of cardboard.
Sorry the picture is so blurry. But whenever I moved the stencil I would line it up best I could and then check that it was level.
Once level I'd secure it with some tape so it lays flat. The flatter your stencil, the crisper your lines will be. Also notice how the stencil is now covered in paint? Since I was using undiluted latex, the paint would eventually make the registration marks impossible to see. So every now and then I'd let the paint on the stencil dry, and then I could peel it right off like a film. No water, soap, or scrubbing required.
A close up of the result, once dried.
Since it took me so long to finish the project, since I've been so busy at work, I never got that "wow" factor because I had been looking at it for so long before it was finished. I wish I could walk into it finished without seeing it before!
Mugs from our travels we keep in the glass cabinet. They don't coordinate, but they remind me of the places we've been.
Aren't these acorn squash pretty? They are from my parent's farm, Chestnut Creek. (The website is designed by your's truly)
The matte paint over the gloss is surprisingly durable, though if you scrape it with something hard it does scratch, so I wouldn't recommend matte over gloss for places that see a lot of movement. It's also not as "scrubbable" as eggshell, semi-gloss, or gloss. Luckily we have a very large stone backsplash, and most of the cooking and what not only happens beneath the backsplash.
So, what do you think of my first stab at stenciling? I wish the color had been a little bit darker, but I'm happy with it. We still have a lot of work to do in the kitchen. I'd like to add a runner, organize our pantry, and fix the crooked cabinets. Since it's a rental, there's only so much we can alter.
Once again, many thanks go out to Royal Design Studio. Make sure you check back next week as I will be introducing a giveaway from Royal Design Studio, and I hope to reveal some of the DIYs I will be doing in the kitchen next week. I can give you a hint: it includes repurposing a piece of furniture to increase storage space, and another DIY that will allow you to gain the equivalent least an entire cabinet!
*disclosure: I received the stencil as a sample from Royal Design Studio
The inspiration for the look I wanted - a gloss/matte sheen effect came from photos I'd collected similar to the one below:
GORGEOUS!
via ?
So...here was our kitchen before...pretty standard for a 1 bedroom apartment in a building...
And...here is the kitchen after...
pretty drastic change right?
The stencil I selected was the Large Marrakesh Trellis. Chris and I took a trip to Morocco two January's ago, and the tiles and ornate plaster work will leave your jaw on the floor. The stencil reminded me of the tours we took of medersas in Fes and Marrakesh.
The stencil as featured on the Royal Design Studio site
An illustration of the stencil showing the registration marks and the scale.
The stencil also came with some instructions and stencil care information.
Once I received the stencil, and before setting off to paint - I did some research on how to achieve the look I wanted. Like most projects, prep work is key!
The Royal Design Studio site offers a lot of resources and tips for stenciling. I got the basics from their Basic Stencil Techniques page for all over stencil patterns.
I knew to achieve the look I wanted I would need the same paint color, but in different sheens. I chose gloss and flat. Here's where I ran into a little issue. Once I got the stencil I realized that, if I put down the solid flat coat first, the way the stencil is cut, most of the wall would end up being gloss. I didn't want that because I was afraid the room would be too shiny. However, upon doing research and asking around, painting a solid base of the gloss and then painting the stencil in flat over the gloss wouldn't work either, because the matte paint would not adhere to the gloss painted wall. Hmmm...I was stuck.
So, being the extremely stubborn woman I am, I did a little more research and came across the talented Megan Bouton, who was the genius behind this wall treatment:
Check out her gorgeous dining room here.
Just the look I wanted! So I wrote her asking what she did to get the matte paint to work over the gloss, and she was awesome enough to reply that she hadn't done anything special, and that even a year later she can't even scratch the matte off with her fingernail.
So, I decided to give it a try, and here is my process and results
First, we covered the walls in a high-gloss navy called "Royal Hyacinth" from Olympic. I hadn't painted in high-gloss before, and it sure is shiny! It also required 3 coats to get everything of uniform "glossiness." You also need to work with a nice wet roller, because if it gets too dry it will just lift up the some of the paint you just put on - which is super noticeable the glossier your paint is. We also taped off the edges with a standard blue painters tape.
Some supplies you will NEED:
• stencil spray adhesive. Don't go with a general adhesive spray - that didn't work for me. Get a spray specifically for stencils at a craft or hobby store. Also - wear a mask when you work with it - it's not the most lung friendly stuff.
• level. very important for making sure you aren't taping the stencil up out of line.
• a small roller. If you are working with glazes and/or diluted paints use a stencil brush, which the folks over at Royal Design Studio recommend. I knew I'd never finish unless I used a roller. I used a brush for corners and touch-ups.
• painter's tape. Okay, I hate to diss a product, but the green tape pictured here - called Frog Tape, wasn't strong enough to hold up the stencil. I'm sure it's great for it's intended purpose, but it wasn't sticky enough for the Mylar stencil. I ended up using the traditional blue painter's tape.
• patience. Don't expect to finish this in the amount of time it takes to simply paint a room. The more care you take doing research, practicing, and lining up your stencil, the more beautiful the result will be.
Optional:
• a brayer: you can purchase at your crafts/hobby store. If helps press the stencil flat on the wall more quickly than using your fingers.
Also - I recommend practicing before you start stenciling, especially if you haven't done it before. I just used a large piece of cardboard.
Sorry the picture is so blurry. But whenever I moved the stencil I would line it up best I could and then check that it was level.
Once level I'd secure it with some tape so it lays flat. The flatter your stencil, the crisper your lines will be. Also notice how the stencil is now covered in paint? Since I was using undiluted latex, the paint would eventually make the registration marks impossible to see. So every now and then I'd let the paint on the stencil dry, and then I could peel it right off like a film. No water, soap, or scrubbing required.
A close up of the result, once dried.
Since it took me so long to finish the project, since I've been so busy at work, I never got that "wow" factor because I had been looking at it for so long before it was finished. I wish I could walk into it finished without seeing it before!
Mugs from our travels we keep in the glass cabinet. They don't coordinate, but they remind me of the places we've been.
Aren't these acorn squash pretty? They are from my parent's farm, Chestnut Creek. (The website is designed by your's truly)
The matte paint over the gloss is surprisingly durable, though if you scrape it with something hard it does scratch, so I wouldn't recommend matte over gloss for places that see a lot of movement. It's also not as "scrubbable" as eggshell, semi-gloss, or gloss. Luckily we have a very large stone backsplash, and most of the cooking and what not only happens beneath the backsplash.
So, what do you think of my first stab at stenciling? I wish the color had been a little bit darker, but I'm happy with it. We still have a lot of work to do in the kitchen. I'd like to add a runner, organize our pantry, and fix the crooked cabinets. Since it's a rental, there's only so much we can alter.
Once again, many thanks go out to Royal Design Studio. Make sure you check back next week as I will be introducing a giveaway from Royal Design Studio, and I hope to reveal some of the DIYs I will be doing in the kitchen next week. I can give you a hint: it includes repurposing a piece of furniture to increase storage space, and another DIY that will allow you to gain the equivalent least an entire cabinet!
*disclosure: I received the stencil as a sample from Royal Design Studio
Subscribe to:
Posts (Atom)